Last summer while learning to bake bread, I also spent a ton of my time reading food blogs, and I read about some other things (besides bread) that I really longed to try: making my own butter, making homemade yogurt, and canning . . . something, anything.
Apparently this is the summer to realize my cooking dreams!
Left: canned salsa
Center: homemade yogurt & granola
Right: cultured butter with 40% rye
I've been following Andrea's (Family & Food & Other Things) canning adventures with Tigress' Can Jam for a long while, and the descriptions of the canning process fascinate me. I love making things from scratch and knowing the exact ingredients of the things I feed my family. Canning just adds a whole new level.
Then a few days ago, we happened to be at a farm supply store and all of their canning supplies were on sale! I couldn't resist. I got a pot with rack, set of canning supplies, and the Ball Blue Guide to Preserving, all for only $25! Can't beat that.
I figured I'd stick them in the basement and give them a try early next summer. And then we found ourselves at the farmer's market this weekend, and I thought about all of the extra tomatoes that I had at home, so we bought a few more tomatoes, a bunch of peppers, and some cilantro, and came home and made SALSA! Salsa has to be one of my hubby's all-time favorite foods, so even though our kitchen was a disaster and I was constantly yelling out for help, he was fully in support of this project and happy to be my faithful assistant.
I chose the zesty salsa recipe from the Blue Book, and although the book says not to vary the recipe at all, I did cut the recipe based on how many tomatoes we had (75% of the original) and subbed in a few different ingredients (mainly types of peppers) based on what we had at the house ~ and added a little extra cilantro because we love it.
Zesty Salsa
(adapted from Ball Blue Guide to Preserving)
7 1/2 cups chopped, peeled, and cored tomatoes
4 cups chopped and seeded peppers (lady slippers, anaheim, pablano)
3 1/2 cups chopped onions (red and yellow)
1 1/2 cups chopped and seeded hot peppers (jalepenos, hot banana)
1 Tbsp minced garlic
1/4 cup chopped cilantro
2 1/4 tsp salt
1 cup vinegar (cider and red wine)
I first chopped everything up for the salsa. In hindsight, I should have started the pots simmering with the bottles and lids then; I didn't anticipate how long they would take to come to a simmer. But then I realized that I had the wrong size lids, so I had to run out to the store to get the right size anyway, so it ended up being better that I hadn't started the pots.
When I got home, I washed the jars and lids and then started all three big pots: one with the salsa, one with the jars and lids, and the canning pot. I was very careful not to let the pots get above 180 F and was thankful for my Thermapen (although I also kept reminding myself that people have been canning since long before instant-read thermometers so it was probably okay not to be too obsessive).
Once the salsa and jars had been simmering for 10 minutes, I started the canning process (with my faithful assistant). Hubby lifted each jar carefully out of the pan and put it on a towel, and then I ladeled in salsa.
He used the jar lifter to take out each lid and place it carefully on the jar. I wiped the threads of the jars clean with a towel and lightly screwed the bands in place.
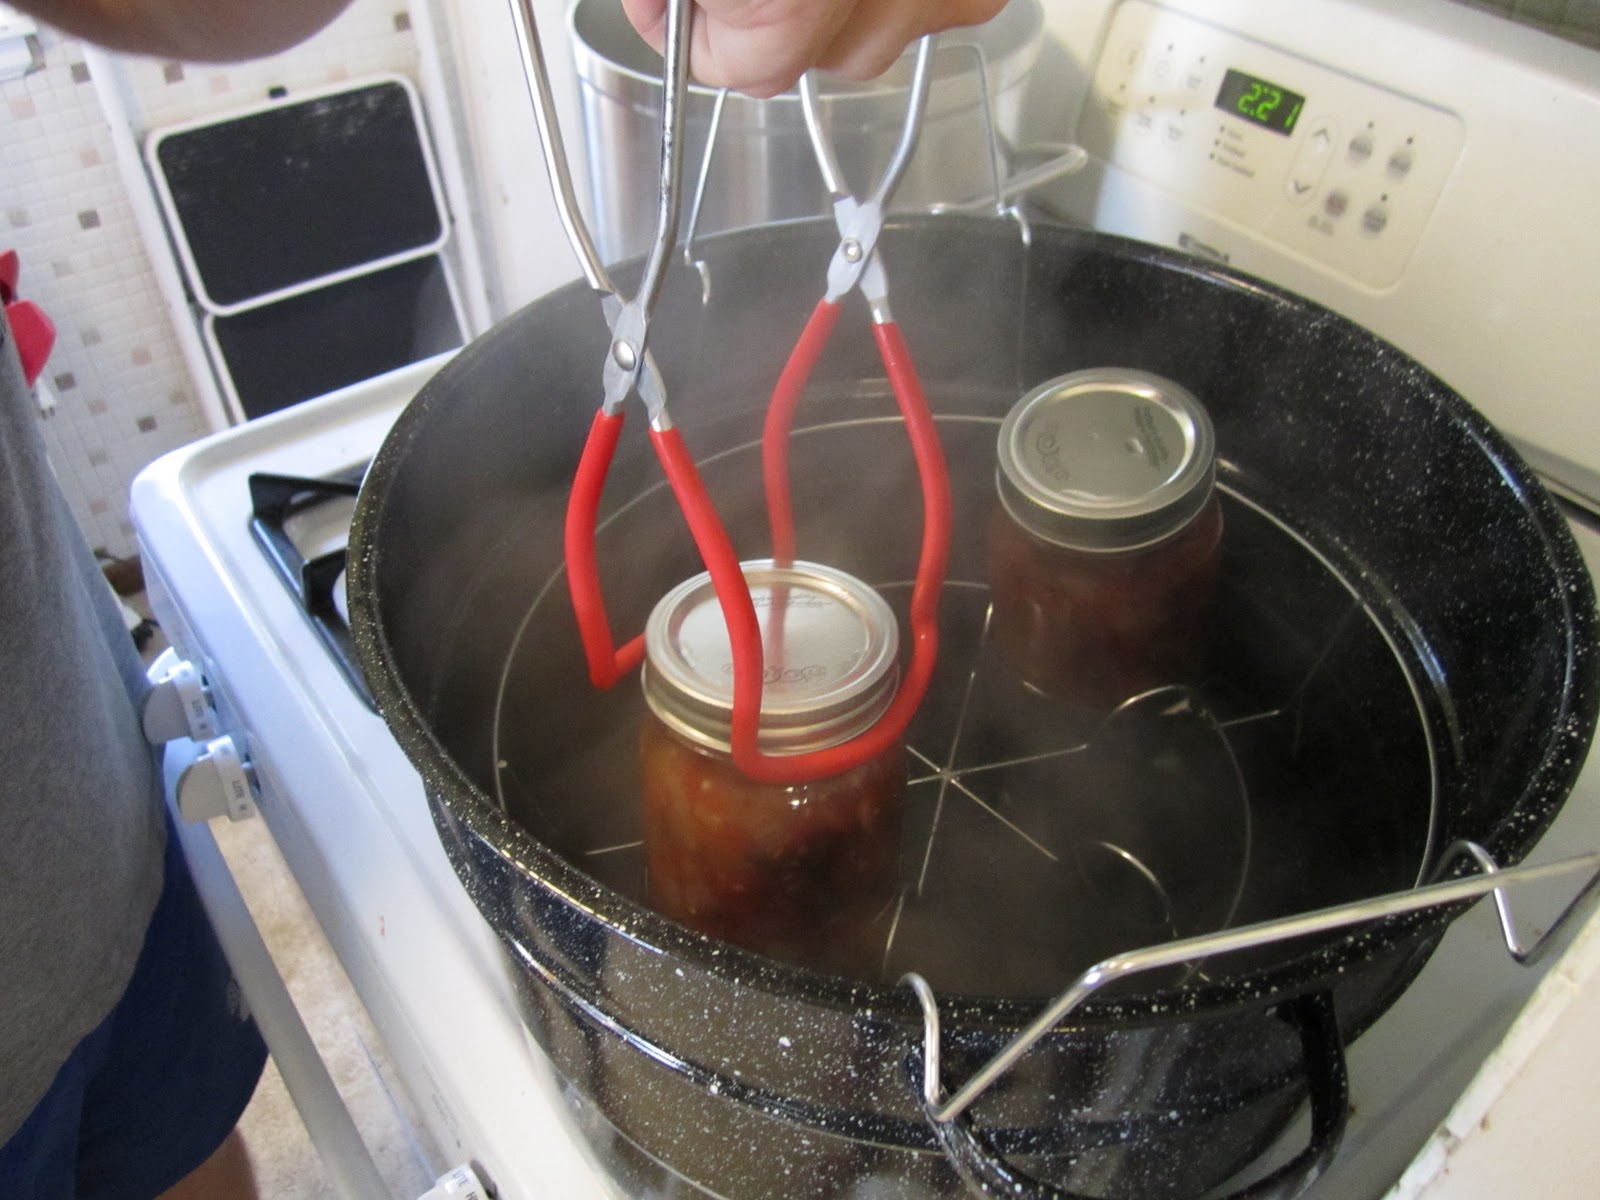
Then hubby used the nifty jar lifter to place them into the canner and lowered the canning rack. We need to work on this step, as we had a hard time getting the pint jars to fit securely in the rack and a couple of them kept tipping over, which was a little stressful.
We covered the pot, brought it to a rolling boil, and set the timer for 15 minutes. Once the timer beeped, we let everything rest for 5 minutes, took out the jars, and left them alone over night. I heard a few satisfying pops! which was exciting.
This morning I checked the lids: there was no give and I couldn't pry them off. I took the bands off and cleaned the bottles and now we have several months worth of bottled salsa ready to go!
Of course, we also popped one open so hubby could give it a try: he loved the various pepper flavors and said he was sad that he's lived with store-bought salsa all this time. I really enjoyed this salsa with chips as well. More importantly, though, my first canning adventure was a success!
Tuesday, August 24, 2010
Monday, August 23, 2010
Modern Baker Challenge: Pita Bread
A couple of my girl friends and their babies were coming over for a last-hurrah-before-school-starts lunch today, and I needed something easy to prepare, preferably ahead of time.
Aha! I thought. My all-time favorite curry chicken salad served in the pita bread from The Modern Baker. Problem solved.
This was both the easiest recipe ever and the most frustrating. It's a quick day-of bread with only one rise and a few rests.
I stirred together the simple ingredients (flour, salt, yeast, water, oil), mixed them a bit, let them rest a few minutes, and mixed them a bit more. The dough was very wet (again) so I added a bit more flour.
Still a little wet and sticky, but I gave it a stretch-and-fold and that helped, and then I put it in an oiled bowl.
An hour later, the dough had doubled, so I divided it in twelve and rolled each piece into a ball. Easy. Rolling them out after a short rest was easy, too. It took two tries through, but all of the pitas rolled out into pretty nice circles. I had some helpers while I was rolling out my dough (by far the highlight of the morning):
The trouble started when I went to put the pita circles into the oven. First of all, they. would. not. slide. off. It reminded me of my first try with the BBA pizza recipe; they all just folded over and crumpled onto themselves. Argh. Once I got them in the oven though, about half of them poufed up nicely. And that part was fun to watch. By the third batch, I decided to put the dough circles on a piece of parchment paper like I do with pizza, and that worked better.
When I went to do the second set, they were totally stuck together. Completely. There was absolutely NO way to separate them, even with the flour between the layers. Maybe because the kitchen had gotten too warm?
Anyway, after chasing the little ones out of the kitchen every few minutes to open the oven and fight with the dough to come off the peel, I decided I had enough pitas for lunch and would just call it quits.
It was pretty cool to make my own pitas, and I really love pita bread. But the taste on these was just so-so, and I found that several of the pitas (ones I had left in for an extra minute to achieve the golden color NM describes) were hard and cracked instead of being soft. So I think I'll try pita bread again . . . but maybe a different recipe.
Saturday, August 21, 2010
Mellow Bakers: 40% caraway rye (August)
This one started with a sourdough soaker last night: rye flour (I only had medium, not whole rye) mixed with water and a bit of Austin (my starter). I've been a little lazier with the background reading in Bread. When I first received The Bread Baker's Apprentice, I read all 100+ pages prior to baking my first loaf. With this one, I just jumped in and have been reading when I have time or a specific question. Anyway, I finally read how to do a rye sourdough (p. 193), and I realized I hadn't been making them quite right. And what do you know, for the first time, my rye sourdough actually showed some movement today!
This afternoon, I mixed the sourdough with bread flour, water, caraway seeds (I had half of what was called for), salt, and a bit of instant yeast. I tried to mix them in the stand mixer as Hamelman instructs, but the dough was really wet and I was only making a half batch, so my dough hook couldn't do much. I ended up pulling it out and doing a few stretch-and-folds on an oiled board. It seemed to work!
The dough doubled in an hour, I formed it into a batard, and it rose again . . . too quickly! I realized too late that the dough was bursting out of the banneton, and the oven and pizza stone were barely preheated. But I didn't have a choice, so I gave it a slash and threw it into the oven.
I was afraid that the dough had overproofed, but given the way the slash opened up and the additional split in the back of the loaf, I guess it hadn't! It didn't rise up much, but it spread out some.
Taste-wise, this bread was delicious with some homemade butter. I'm sure it will make great sandwiches, too. It reminds me of the April light rye, which we also really enjoyed. I think Hamelman is turning me into a rye-lover!
Modern Baker Challenge: Prosciutto Bread
Phyl (Of Cabbages & King Cakes) thought this bread was pretty good, but really lamented the fact that it wasn't made with cheese, unlike the casatiello from the BBA Challenge. We loved the casatiello, so I took Phyl's advice and, in addition to the prosciutto, added some chunks of provolone as well.
This was an easy-peasy bread to throw together. I mixed everything, let it rest, gave it some stretch and folds, and let it rise. I'd only made enough for one loaf, so I shaped it into a batard, let it rise again, and baked it. It didn't rise much ~ just spread out. It was finished 10 minutes before the timer went off, and I was a little panicky when I tried to get it off the pan. At first I was a little crabby that N.M. had only called for cornmeal and not something else to help it release ~ then I realized that it was the cheese making it stick, and that it was completely my own fault! And then I realized that with a spatula, it actually came off pretty easily. Phew!
Hubby loved this bread. Probably not as much as the casatiello, but it's certainly much faster to make. I can see making it again when he requests castatiello, which he does with some frequency. The kids and I all had a few nibbles, but the meat was way too salty for me, so it will be up to hubby to finish the loaf. I'm sure he's up to the challenge.
Monday, August 16, 2010
Modern Baker Challenge: Seven grain and seed bread
My dad asked hubby to have me make and bring sandwiches to the ballpark yesterday. "I can't," said hubby. "We don't have any bread in the house."
"No bread in the house?!" asked my dad, incredulously. "How does an obsessive bread baker not have bread in the house?!"
Indeed. So this morning, I opened The Modern Baker and turned to seven grain and seed bread which has gotten good reviews from both Andrea and Phyl. I love a good multi-grain, and was pretty happy with the recipe from the BBA until I tried Mags' oatmeal bread which became my go-to recipe. Hamelman's was great, too. Like I said, I love multi-grain breads.
I was pleasantly surprised with how quickly this bread came together. I started it at 6:30 this morning and it was ready for sandwiches well before lunch at 11:30.
Nick Malgieri calls for a cup of seeds ~ 1/3 cup each of poppy seeds, sesame seeds, and sunflower seeds. I didn't have them on hand, and we really needed bread, so I figured that I'd just make do with what I had on hand, and if the bread was good, try it again with the called-for seeds. I was able to gather a little under 3/4 cup of seeds: poppy, sesame, and flax. I added some brown rice, too, to the oatmeal soaker. I was also just about out of whole wheat flour, so I used what I had left and then filled in the rest with white whole wheat. I also used all-purpose flour and rye flour.
The dough was really, really wet. Was it because I weighed my ingredients instead of measuring? I feel like I get more flour when I scoop it into a measuring cup. At any rate, I had to add almost a cup of extra flour before I got a dough that wasn't so sticky that it glopped all over the bowl and my hands. And I'd even used less water, just in case. With the extra flour, it behaved beautifully.
Once it was ready to proof, the dough rose really quickly; it doubled in just under an hour. I'm not sure why, as our heat wave has passed and it is absolutely gorgeous here right now; our house was a comfortable 69 F this morning. After forming, the loaves rose quickly again, filling the pans in about 45 minutes. They took about 35 minutes to reach an internal temperature of 185 F.
This bread made an awesome turkey sandwich for lunch, and it was also incredibly delicious with butter. Hubby and I both loved it. Unfortunately the kids don't care for breads with interesting textures (ie, seeds), so they didn't like it at all. Still, I would easily make it again ~ if the kids don't like it, it just means more for us!
Saturday, August 14, 2010
Modern Baker Challenge: Parisian Fruit Tart
When I first received my copy of Nick Malgieri's The Modern Baker in the mail and paged through it, I knew I would have to make the Parisian Fruit Tart for my dad's birthday, even though we're not scheduled to get to the sweet tarts and pies section of the Modern Baker Challenge for a long time.
This is my dad's ideal birthday treat: a sugar cookie crust with a pastry cream filling and lots of fresh fruit (especially berries). (It's hard to believe that we share the same genes, given that his ideal dessert is made completely without chocolate ~ the horror!) I used to have to go to a super fancy restaurant/bakery in town to pick up one of these for his birthday ~ and hope that they had them made that day, because they didn't always.
This year, I made my own.
N.M. says that this tart and crust need to be made the day you're going to serve them, so that's what I did. This morning, I started with the press-in cookie dough. It's simple enough to make: cream butter and sugar, add vanilla and an egg yolk, and finally some flour. N.M. instructs you to then scrape the dough out and press it into the tart pan. I found this totally impossible. The dough was so wet that, even with floured hands, it stuck to my fingers and every time I filled in one hole in the bottom of the tart pan, another one opened up. I tried sticking it in the fridge to cool it down for an hour, as you do with sugar cookie dough; after all, it was a pretty hot day today. But it didn't matter; it was still incredibly difficult to get it to fill the pan evenly. And forget rolling it in logs to get it to stick to the sides! I just took tiny globs and stuffed them on each part of the fluted pan.
The rest of the recipe was easy: the pastry cream, the fruit, and the glaze. I'm not completely convinced that the tart needs the apricot preserve glaze ~ I think it would be great plain ~ but the glaze didn't hurt anything, either.
Cutting the tart was my other challenge, but N.M. warns about this; he actually calls for mini-tarts: "though they lack the dramatic punch of one large one, which is not easy to cut into neat wedges." But I didn't have mini tart pans; only the 11 inch that I purchased for the chocolate orange almond tart.
We celebrated my dad's birthday at the ballpark, where the family has season tickets for our minor league baseball team, so I did my best to create a baseball shape with my fruit; hubby helped with the design. Even though the tart didn't stay in neat slices, the whole thing disappeared by the time the ballgame started and met with rave reviews. I can definitely see making this recipe again, although I think I may experiment with a different crust next time.
Thursday, August 12, 2010
Help from my friends, part 2: Semolina buns
A while ago, I wrote about how much I love the food blogging community for all of the wonderful ideas they share which improve my family's eating experience; well, they did it again!
While on vacation a few weeks ago, three writers I follow all wrote about the same Dan Lepard recipe for semolina bbq buns. Joanna (Zeb Bakes), Di (Di's Kitchen Notebook), and Celia (Fig Jam and Lime Cordial) all gave glowing reviews to this recipe, saying that the unusual buns made with semolina were perfect for burgers, chicken salad, spicy Italian sausages, and even plain ol' peanut butter. I knew I had to try them.
The recipe was easy to follow and the bread came together easily. I soaked semolina in boiling water for 10 minutes, and then added the remaining ingredients (unsalted butter, yeast, salt, bread flour, water, honey, and yogurt). Then I followed the Dan Lepard technique for developing gluten.
Ever since "meeting" Joanna through the Mellow Bakers, I have been interested in the Dan Lepard technique she uses and writes about; it is similar to the stretch-and-fold in that it uses mimimal effort and more time in order to extract gluten development and maximum flavor out of a dough. D.L. uses short bursts of kneading: for example, in this recipe you knead for 10 seconds, rest for 15 minutes, knead for 10 seconds, rest for 15 minutes. Then rest for an hour and proceed with shaping. As with the stretch-and-fold, it's amazing to watch how the dough changes over time without endless kneading.
I rolled out the dough and then divided it into eight buns, without actually separating them. I had some problems getting my dough into a rectangle shape; it insisted on moving back into an oval, and I was in a rush, so I let it be and we ended up with some oddly shaped buns. After another rest, I spritzed them with water, sprinkled them with semolina, and scored them with a butter knife. Then I baked them, and then we ate.
Hubby loved these as a bun for his burger. The kiddos and I generally eat burgers without buns, so we ate them on the side with butter. Delish!
Subscribe to:
Posts (Atom)