Tuesday, May 31, 2011

Mellow Bakers: Roasted hazelnut and prune bread (May)


Our final May Mellow Bakers bread was roasted hazelnut and prune bread. I've never been a big hazelnut fan, and I've been subbing other nuts whenever our breads have called for hazelnuts. But I'd finally found some at the store, so I decided to try them.

This is made with a stiff levain, some whole wheat flour, bread flour, a tiny bit of instant yeast, salt, water, a bit of butter, roasted hazelnuts, and some chopped up prunes.

I made the levain last night and mixed everything this morning. Then the little ones asked for a visit to the science museum, so I stuck the dough in the fridge. When I got home, the dough had doubled, so I pulled it out and shaped it. It took quite a while to rise, and then I baked it with steam.

This bread was okay. I was right; I really don't like hazelnuts, but my hubby thought they were pretty good. In the future, I'll go back to replacing them with other nuts.

Monday, May 30, 2011

Bake! Danish apricot pinwheels


Finally!!! Our grocery store finally had apricots yesterday, so I was finally able to make Andrea's Bake! pick: Danish apricot pinwheels. I've never purchased fresh apricots before...or eaten them (I don't think), so I was really curious.

I still had a pound of quick Danish pastry dough in the freezer (from the Danish cheese pockets), so this recipe was actually pretty easy to put together.

For the filling, I mixed ground almonds, unsalted butter, sugar, egg yolks, lemon zest, vanilla, and flour.

Then it's assembly time: roll out the pastry dough, cut it into four-inch squares, and then form the pinwheels. Dollop a heaping teaspoon of the almond filling in the center, put half of a fresh apricot on top, and fold alternating corners of the pinwheels to the center. You're supposed to use a one-inch circle of dough in the center; I don't have one, so I used a mini-heart. It looked pretty cute! I was surprised by how easy the assembly actually was.


The pastries rest for a bit and then bake for 20 minutes. Then they're sprinkled with a healthy dose of powdered sugar before serving.


These were pretty yummy. The apricots were a little bitter, which contrasted nicely with the sweet from the sugar and the pastry crust. Are apricots always slightly bitter or were these just not ripe yet? I couldn't taste much of the almond filling; I had a bunch of it leftover, so I think next time, I'd up the filling until I'd used all of it. A fun breakfast treat!

Saturday, May 28, 2011

Frying, part 2: homemade corn dogs


I made a batch of Peter Reinhart's all-purpose sweet dough (from ABED) a couple of weeks ago, pretty much just for fun. I used half of it for my monkey muffin experiment, and then split the other half into a 500 g and a 250 g batch to freeze.

Last night, I pulled out the 500 g, and this morning I made a batch of homemade doughnuts for my bookclub (and my hubby...and my kids...and me).

There was already a pan full of oil and my house already smelled like deep frying, so I decided to try this intriguing recipe for corn dogs that Freida posted last week. (Not our healthiest day ever: doughnuts for breakfast, corn dogs for lunch.)

I followed Freida's recipe, and my batter was even thicker than hers in her pictures. We had a bit of difficulty getting it to stick to the little hot dogs; eventually, my hubby ended up almost painting it on. We discovered that less is more; just a thin coating of batter made a perfect corn dog. I also only cooked mine for about a minute until they were beautifully golden.

These seriously tasted just like State Fair corn dogs...soooo tasty and so much fun! Thanks, Freida!

Monday, May 23, 2011

Mellow Bakers: Pissaladière (May)

I never, never would've expected I'd be willing to make a recipe that started with this:


so you can imagine my emotions when I saw pissaladière on the May list of breads for Mellow Bakers. JH describes pissaladière as: "the pizza of Provence, replete with onions cooked long and slow, fresh herbs, anchovies, and pungent black niçoise olives."


On the one hand, we are not fish people; on the other hand, we love pizza more than just about any other meal.

Due to scheduling and life and whatever, I actually made this bread over three days. I made the pâte fermentée (bread flour, water, salt, and yeast) on Saturday evening and let it ripen until Sunday afternoon. At that point, I added more bread flour, some whole wheat flour, water, salt, yeast, the pâte fermentée, and finally, some olive oil. The dough was kneaded briefly and then allowed to proof for two hours, with a strech-and-fold halfway through.

But then I realized we didn't have any onions, and we needed to feed the kids dinner, so I threw one pound of dough into the freezer and one into the fridge.

Tonight (after buying some onions), I made the topping: onions and garlic sautéed in olive oil and mixed with fresh thyme and salt and pepper. I dumped them on the crust, along with black olives, thinly sliced anchovies, (and pepperoni). We baked it for about 10 minutes at 515º.

I kind of wish this had been described as an appetizer, a flatbread with unusual toppings, instead of as a pizza. We are red sauce and mozzarella pizza people (especially my hubby), and this was nothing like our usual pizza. However, the crust was tasty; I liked the addition of the whole wheat flour. And the onions were pretty good (I wish I'd cooked them a little longer to caramelize them). I was going to try the little anchovy corner, but the smell just did me in, so hubby was the designated taste tester. His comment: "salty."

Not one we'll make again, but I'm glad we tried it. I'm sure we'll make our traditional pizza with the remaining pound of dough.

Sunday, May 22, 2011

Mellow Bakers: Five-grain bread with paté fermentée (May)

Cutting it a bit close, aren't I? Almost to the last week of May, and I haven't made any of the Mellow Bakers' May breads yet...yikes!

So here's the first one: five grain bread with paté fermentée. I made the paté fermentée on Friday night: bread flour, water, salt, and a tiny bit of yeast. I also made a soaker, using oats, rye, wheat flakes, flaxseeds, and sunflower seeds.

On Saturday evening, when the paté fermentée was properly domed, I mixed up the rest of the bread dough: more bread flour, water, salt, yeast, the soaker, and the paté fermentée. The dough rose for two hours with a fold in the middle. Then I put the two-pound loaf (I made a half-recipe) into my biggest 9x5 loaf pan, put it in a plastic bag, and stuck it in the fridge over night.

This morning, the dough had risen above the lip of the pan, so I stuck it in a 350F oven for 45 minutes until the internal temperature reached 190F.

The bread has a nice flavor from the grains, and hubby really enjoyed the added crunch from the sunflower seeds. It made excellent sandwiches for lunch.

Saturday, May 21, 2011

Bake! scones


Saturdays are my days to get up with the kiddos. They got up especially early today (we were downstairs by 5:30), and while I can usually get an hour or so of quiet cuddle time, today, they were up and at 'em, ready to turn on the lights, eat breakfast, and play. What's a tired mommy to do? Bake some scones, of course!

Our Bake! pick for this weekend was cream cheese scones, chosen by Glennis. (Don't worry, I'm still planning to make Andrea's pick from last week: Danish apricot pinwheels...but our grocer said their grower had a slow start and we won't have fresh apricots until the very end of May.) I really love scones, so the cream cheese scones were one of the first recipes I tried when I got this book for Christmas.


Unfortunately, I was the only one who liked them, and they weren't among my favorite NM scones. (The kiddos hear "scones" and instantly think I mean their favorite "butternut chocolate chip scones"...they get upset if I say "scones" and that's not what I make. And yes, they really say "butternut" instead of "butterscotch" and I think it's so cute that I just can't correct them.)

So I decided to do a flashback instead and bake the first recipe that Kayte and Phyl baked from Bake!, back before I'd gotten my book: orange and almond scones. Figuring that the kids still wouldn't like them (the lack of chocolate chips factor), I made a half batch. They were easy to throw together: flour, sugar, baking powder, and salt, pulsed in the food processor. Add some almond paste, then some butter, and finally the liquids (milk, egg, and orange zest).

The scones are patted into a circle, cut partially apart, brushed with an egg wash, sprinkled with almonds (all except two for the kiddos), and then we gave them a small dusting of turbinado sugar (great task for the little ones).

As instructed, I cooked them for 15 minutes and then cooled them for a few minutes more on the tray. And then I went to separate them into individual scones...and they were still raw inside!!!! Argh!! I quickly turned the oven back on, separated them all, and put them back in for another five minutes with fingers-crossed.

It worked! Five minutes later, they were much darker and cooked through. I really liked these...I loved the hints of almond and orange, and the slight sweetness. The kids gobbled up their almond-free ones...even without chocolate chips! Now I'm just sad that I only made a half-batch...thankfully it will be easy enough to whip up some more. =)

Friday, May 20, 2011

Jumping on the bandwagon: the best ever double-chocolate cake

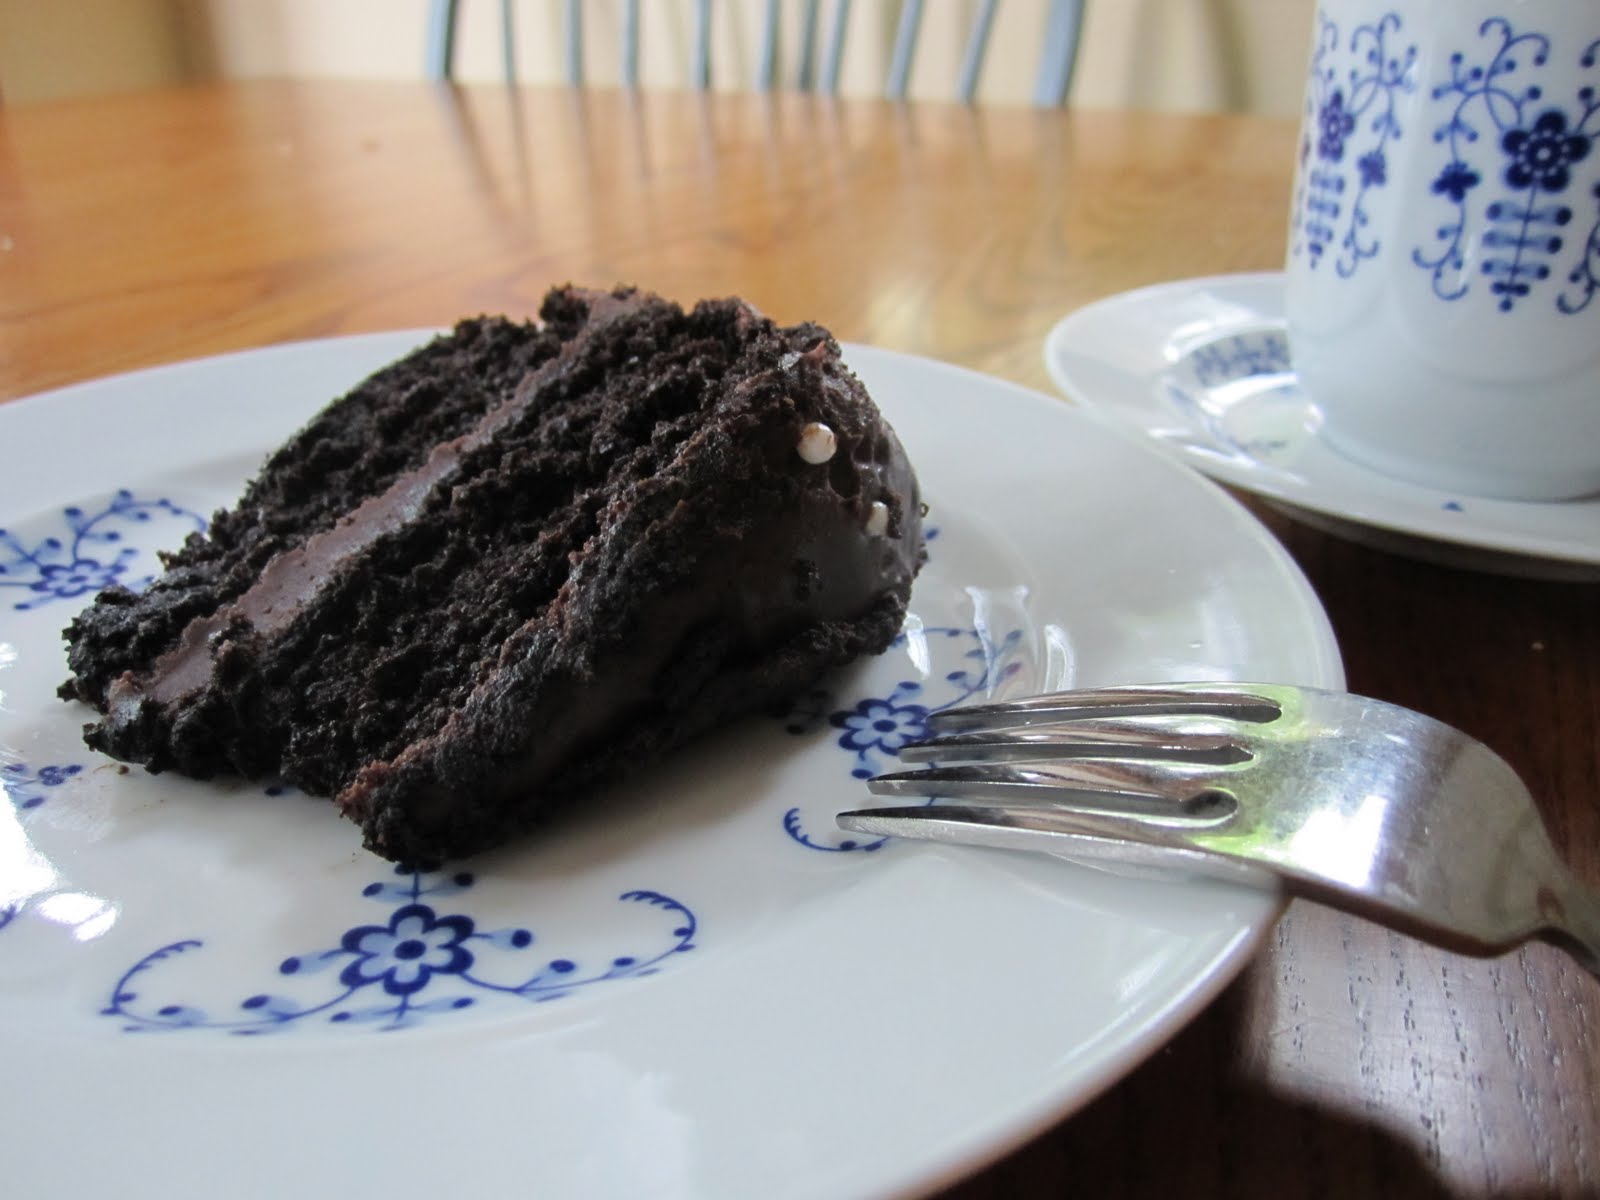
This was all that was left to be photographed of the best-ever chocolate cake.
I went to work on Monday as usual, saw my friends/coworkers at lunch as usual, chatted about our weekends, and it wasn't until I got home and checked FB that I realized that it was one of my friend's birthday! And not just a birthday, but a big 6-0 birthday! I was so sad that I hadn't known in time to make her a birthday treat.

This is a friend with a lot of will-power...she turns down every goodie offered at the lunch table. So while normally I would want a birthday treat to be a surprise, I grilled her yesterday because I really have no idea what she likes (as I said, she always says no). I informed her that she would be getting a birthday treat and she would eat it...so what should I make? She said either chocolate-chocolate cake (preferably dark chocolate) or carrot cake. Figuring I'd make a little cake for work and a few extra cupcakes for home, I gave the choice to hubby. His response? "Make the chocolate cake...but that could just be the fat guy talking."

I searched and searched for a good recipe...I checked my baking challenge books (killing two birds and all), but all of NM's recipes seemed to require much more time than I had to give to complete all of the steps. Finally, I discovered this recipe, via Smitten Kitchen, and it didn't seem too complicated and I had all of the ingredients on hand. As usual, I read most of the reviews. I could not find one single negative comment, and there were about a billion "this is the best chocolate cake ever" comments.

I halved the recipe and then followed it as written. Well, except I only had one bar of semi-sweet chocolate in the house (and my friend had requested dark chocolate anyway), so I used it, plus part of two 60% bars, and a tiny bit of a 72% bar. Oh, when I asked hubby to brew me a bit of coffee, he used French vanilla flavored coffee. And I didn't have buttermilk, so I used milk + lemon juice. And I guess my cocoa isn't entirely natural (it's Hershey's Special Dark, which is part natural and part dutched). Hm...why don't I just give you my ingredient list? (Sorry for the mixed measurements...I'll convert them all to grams the next time I make it.)

Double chocolate layer cake
adapted from Gourmet, March 1999

for the cake layers:
1.5 oz semi-sweet chocolate (I used Ghirardelli)
.75 oz hot brewed coffee (French vanilla)
1 1/2 cup sugar
1 1/4 cup all-purpose flour
3/4 cup cocoa powder (I used Hershey's Special Dark)
1 tsp baking soda
3/8 tsp baking powder
5/8 tsp salt
75 g eggs (I used about 1 1/2)
3/8 cup oil (I used safflower)
3/4 cup milk + 3/4 tbsp lemon juice (= fake buttermilk)
1/2 tsp vanilla extract

for the frosting:
8 oz mixed chocolate (I used Ghirardelli semisweet + Ghirardelli 60% + Lindt 60% + Lindt 72%)
1/2 cup heavy cream
1 tbsp sugar
1 tbsp light corn syrup
2 tbsp unsalted butter, softened

For the cake layers:
1. Preheat oven to 300°F.
2. Line bottoms of pans with parchment paper and grease them.
3. Chop the chocolate into small pieces and then pour the hot coffee over them. Let it stand, stirring a few times, until all of the chocolate is melted (it took about 5 minutes for me).
4. Sift the flour, sugar, cocoa powder, baking soda, baking powder, and salt together in a large bowl.
5. In a different bowl, beat the eggs until thickened slightly (about 3 minutes in the stand mixer). Slowly add the oil, buttermilk (or fake buttermilk), vanilla, and coffee/chocolate mixture. Beat until combined.
6. Add dry ingredients and beat on medium speed until combined.
7. Divide batter between pans. (I put 380 g of batter into each of my 6" rounds and then made 5 cupcakes (filled about 2/3 full)).
8. Bake until testing skewer comes out with a few crumbs but no wet batter (my cupcakes were done in 30 minutes; the cake was done in 50 minutes).
9. Cool pans on a cooling rack. When cool enough to touch, invert cake layers onto rack and allow to finish cooling completely. (Mine took about 2 hours to cool. Having read that it's a very moist cake which can make it difficult to frost, I stuck the layers in the fridge for about 20 minutes prior to frosting.)

For the frosting:
1. Chop the chocolate into small pieces.
2. In a small saucepan, bring cream, sugar, and corn syrup to a boil over moderately low heat, whisking until the sugar dissolves.
3. Remove pan from heat and add chocolate. Whisk until the chocolate is melted.
4. Add the butter and whisk until melted.
5. Allow to cool before frosting. (The half-batch of frosting was perfect for the 6" double layer cake and a small smear on the top of the cupcakes.)


*******
This cake was a hit! It was dark and chocolately and rich and dense and so incredibly moist. I was worried that the frosting would be too dark, but it ended up being a perfect match for the cake. We were able to get about 10 smallish slices out of it, which were perfectly sized because it was so rich.

Given how easy it was to make, and that the birthday girl declared it was the best chocolate cake she'd ever had, this will be our new go-to chocolate cake recipe. Try it!

Tuesday, May 17, 2011

Monkey muffins


When I suggested to my family that I make monkey bread for a breakfast treat, my little one wailed: "But I don't eat monkeys!!!"

My kids have never had monkey bread; in fact, I'm fairly new to it myself. I've only had it a couple of times (at my mother-in-law's), but I remember the tasty, caramely goodness and I remember that everyone devoured it. Seemed like it might be fun on a lazy morning when I didn't have to work (I took the day off for the little guy's preschool party).

I mixed up the dough yesterday evening and assembled my mini monkey muffins before bed. This morning, I pulled the pans out of the fridge, warmed them briefly until they rose slightly, and then baked them.

Some recipes I found suggest frosting monkey bread, either with a cream cheese frosting or a sugar frosting...hubby and I agreed that monkey bread is best eaten plain, so that's what we did.


All-purpose sweet dough
adapted slightly from Peter Reinhart's Artisan Breads Every Day
400 g unbleached all-purpose flour
7 g  salt
45 g sugar
8 g instant yeast
240 g whole milk (warmed to 95F)
60 g melted unsalted butter
5 g vanilla extract (1/2 tbsp)

Topping
adapted from America's Test Kitchen Family Cookbook
113 g unsalted butter, melted and cooled slightly (1 stick)
10 g vanilla extract (1 tbsp)
150 g sugar
175 g light brown sugar
3 g fancy Vietnamese cinnamon (2 tsp)
2 g salt (1/4 tsp)
finely chopped pecans (optional)


1. Combine the flour, salt, and sugar for the dough in a mixing bowl.
2. Whisk the yeast into the warmed milk, and then pour into the dry ingredients. Add the vanilla extract and melted butter.
3. Stir until mixture forms a coarse ball.
4. Knead with dough hook (or knead by hand) for three or four minutes, until the dough is soft and supple.
5. Put dough into a lightly oiled bowl and cover with plastic wrap. Allow to rise for an hour or two (until doubled); I gave it a stretch and fold after about 45 minutes.
6. Lightly grease your pans (I used a muffin tin and a mini bundt pan).
7. For the topping, mix the sugar, brown sugar, cinnamon, and salt, and place in a shallow bowl. Put the melted butter in another shallow bowl.
8. Cut the dough into small, fairly equal pieces and roll them into tight balls (I aimed for the size of a walnut, but some were smaller; I wasn't too particular).
9. Dip the balls into the butter and then roll them into the cinnamon sugar mixture. Place them in the prepared pans. (I put three balls in each muffin cup. I used about 6 - 10 in each mini bundt pan.)
10. If using pecans: coat pecan pieces in a little butter, then toss with a little of the cinnamon sugar mixture. Pour them into the muffin cups before putting the dough balls in.
11. Cover the pans and let them rise OR put them in the fridge overnight (that's what I did). In the morning, briefly preheat the oven to warm it up, then turn it off and put the covered pans in for an hour or so, until the dough is nice and puffy.
12. Remove pans from oven and preheat oven to 350 F. Bake buns for about 15 minutes until the dough is golden and the caramel is nice and bubbly.
13. Theoretically, cool them for a few minutes...or at least try not to burn your fingers and mouth when you instantly devour them.

Verdict: These were so yummy...and not too overwhelmingly sweet. I did have a bit of a struggle removing the ones from the mini bundt without them falling apart; I think I'll just make muffins next time. The kids prefer our normal cinnamon rolls, but they still happily ate their monkey bread. This is such a fun, easy thing to do with leftover dough. These will definitely be a repeat!

Tuesday, May 10, 2011

Modern Baker Challenge: Sour-cream apple pie


What makes you feel better after a slightly stressful afternoon? Me, I decided to come home and bake a pie with my little girl.

This is my thirteenth recipe from the sweet tarts and pies section of The Modern Baker. Based entirely on what I had in the kitchen (and the fact that the last batch of apples we bought were a little bruised and battered), we decided to make sour-cream apple pie.

Before I purchased my own set of 4 1/2" tart pans (which I love, by the way), I asked my dad if he had any small tart pans. He didn't have what I was looking for, but he did find two 4 1/2" pie plates which he gave me just in case. The little girl and I debuted them this afternoon.

I made 1/3 recipe of the apple filling (apples, unsalted butter, and sugar), the sour cream custard (flour, sugar, eggs, vanilla extract, and sour cream), and the crumb topping (flour, sugar, baking powder, cinnamon, and unsalted butter). It was absolutely perfect for the two mini pie plates.

I used a little packet of sweet tart dough that was in my freezer (1/3 of the full recipe). For the first time, I hadn't defrosted the dough in the fridge ahead of time, so I did an experiment. I pulled it out of the freezer and set it on the counter. By the time I was finished making the two fillings and the crumb topping, the dough was defrosted enough that I could use my rolling pin but it wasn't warm at all. Hurrah!

The mini pies baked for 45 minutes. I was waiting for the crumb topping to get darker, but I think I'd pull them out at 35 or 40 minutes next time; the filling was a tad dry. Still, this was a delicious pie. NM says that it needs no accompaniment; true, it doesn't need one, but it wasn't hurt by a little scoop of vanilla ice cream either! =) Another winner!

Wednesday, May 4, 2011

Mellow Bakers: Pain rustique (June)


Here we are with the first Mellow Bakers bread for June: pain rustique.

What?! It's only May?! I actually haven't made any of the May breads yet, but I'm making soup for dinner tomorrow, and I needed a bread to go with it. I saw pain rustique on the June list, and it's one I've been wanting to make for quite a while, so I decided to jump ahead.

The pain rustique starts with a poolish: bread flour, water, and a teeny tiny bit of yeast, mixed together and then left to ferment for 16 hours.

The next day, the poolish is mixed with the rest of the bread flour and water, and then left to autolyse for 30 minutes. Finally, the salt and the rest of the yeast are sprinkled over the top, the whole thing is kneaded, and then it's left to rise for a short time with two stretch-and-folds every 25 minutes.

I was trying to make this bread in the midst of normal life, so I made the poolish as late as possible last night, rushed home after school (luckily my school is only a few blocks away) to mix in the flour and water, rushed to pick up my kids, rushed home to add the salt and yeast and mix. Then a quick trip to the zoo, which ended up taking a lot longer than anticipated because we ran into some friends and stayed to play. When I got home, the proofing time was technically almost over, so I did two stretch-and-folds and then let the bread proof for an additional 25 minutes.

Then the dough was separated into three chunks, and placed, floured side down, on a floured couche to rise for 25 additional minutes. Finally, the loaves were flipped onto a pan, given a quick slash, and baked with steam for about 30 minutes. Because the oven was busy with hamburger buns and then french fries, I didn't have time to preheat my baking stone, so I just baked the loaves on a sheet pan, using the fake hearth baking method (an aluminum pan spritzed with water).

This bread was a cross between ciabatta and rustic bread: soft, creamy texture, fairly open crumb with no big holes, delicious with butter. Personally, I prefer both our normal ciabatta and JH's other rustic bread with whole wheat, but hubby couldn't stop raving about this one. It is definitely a tasty bread!

Modern Baker Challenge: Lemony cheese tart

The next tart I made for the Modern Baker Challenge was the lemony cheese tart with sour cream glaze.


The filling is made by mixing softened cream cheese, sugar, vanilla extract, lemon zest, eggs, and sour cream. These are placed into a sweet tart crust (actually two mini crusts). Even though they were mini, they baked for the full thirty minutes. While they were baking, I mixed up the sour cream glaze: sour cream, sugar, and vanilla extract. When I pulled the tarts out of the oven, I poured the glaze over the top. Unfortunately, I had filled the tarts so full (I'd used most of a third of the recipe in the two mini tarts) that the glaze ran off the edges and made a bit of a mess. But I got it cleaned up, put the tarts back into the oven for ten more minutes, and then took them out to cool.

Hubby and I enjoyed one of the mini tarts that night, warm from the oven. It was really yummy. It was even better the next night, cold from the fridge; it tasted like a lemony cheese cake.

Tuesday, May 3, 2011

Twitter chef avatar fun: David Chang's Steak lettuce wraps


The May chef for our Twitter avatar fun (a group of us are baking/cooking from a new chef each month and using that recipe as our Twitter avatar) is David Chang, chosen by Tracey. I'd never heard of David Chang or his restaurant Momofuku before this month's challenge, and I've had fun reading up on him and his restaurants. I did have a tough time finding many online recipes, but when I stumbled on this recipe for steak in lettuce rolls, I knew my search was over.

The recipe was pretty easy, although several of the steps do require you to start a little early. An hour or so before dinner, I started a saucepan of brown rice, marinated the steak, and mixed up the scallion salad. The steak is marinated in an interesting mixture of apple juice, low sodium soy sauce, garlic, ginger, sliced onion, lemon juice, dark sesame oil, and sugar. The scallion salad is sliced green onions, red chiles, rice vinegar, low sodium soy sauce, and dark sesame oil. Knowing that the kids and I have a much lower tolerance for spicy foods than my hubby, I only used one of the chiles in the scallion salad; the other, I sliced and put in a bowl for hubby (who used them all in his lettuce wraps).

Once it's dinner time, the steak is quickly grilled over high heat, then set aside for a rest, while the onions from the marinade are sauteed. And then it's assembly time!

I did have a challenge finding the soybean paste David Chang calls for, so I did a little research on substitutions. I'm glad I did because apparently the brand Chang recommends (Ssamjang) is a Korean soybean paste, which is different from other soybean pastes, and is actually mixed with red chili pepper paste. While the steak was marinating and the rice was cooking, I ran out to the store to check one more time; I didn't find the right brand, but I did find a Korean "everyday sauce," which said on the back that it was "soybean paste mixed with red chili"...perfect!

The wraps are assembled by piling rice, scallion salad, soybean paste, steak, and onions on a lettuce leaf. It was no surprise that the kids both ate the steak out of their wraps and then asked for cereal. I thought the wraps were okay; they were pretty spicy for me (even with only one chili pepper and just a tiny bit of the spicy soybean paste). But that wasn't a surprise either...these aren't really my thing. I really made them for my hubby, who absolutely loved them. Therefore, I consider this challenge a success!

Monday, May 2, 2011

Bake! Strawberry chantilly cake


Our next recipe from Bake! was chosen by Kayte: strawberry chantilly cake, in honor of her birthday.

NM says to wait until you can find perfectly ripe, local strawberries. I knew I'd have a loooooong wait (we had snow flurries yesterday at our May Day parade, after all). I could've made the Victoria sandwich variation, like Andrea did; it also looks wonderful.

But my baby sister just got accepted into nursing school (yay!!!), and she had a barbecue this weekend. I really wanted a fancy cake to celebrate, so I decided to just use our grocery store strawberries and cross my fingers that they were sweet and flavorful enough.

I copied Kayte, who's been raving about her little 6" pans, and picked up a couple of 6" cake pans. They were so fun! I used a half batch of the yellow cake recipe; I was initially worried because it seemed like so little batter in each of the pans, but I think the pans are just overly deep because the layers ended up being perfect (I actually weighed them to be sure I had the same amount of batter in each pan; I've never done that before, but I will do it from now on...so much easier than eye-balling it!).


The morning of the party, I made the whipped cream. I made 2/3 of the whipped cream recipe, but I had a lot left over. Next time, I'll just make 1/2 batch. Then I layered: one layer of the cake, a coating of whipped cream, slices of strawberries, more whipped cream, the other cake layer. And then whipped cream around the outside. To celebrate my sister's new career, I used the strawberries in an attempt to create the red nursing cross symbol on top...it's the thought that counts, I guess! ;)

The cake was a big hit. We ended up with a bigger crowd than expected, so I had to serve skinny slices...I was able to get 12 slices from the 6" cake. The cake itself was a yummy recipe, and you can't go wrong with strawberries, whipped cream, and cake!